We integrated the basic app and the webhooks in the first part of this tutorial, so now we will look at how to further integrate apps into our Confluence Cloud development instance.
Display links to dynamically created pages in Confluence Cloud
Next, we need to create a Spring controller, that renders a simple template with the Thymeleaf template language, and to to get access to a parameter, or model attribute in our render context:
@Controller
public class InfoController {

  @RequestMapping(value = "/info-page", method = RequestMethod.GET)
  public String infoPage(@AuthenticationPrincipal AtlassianHostUser hostUser, Model model) {
    model.addAttribute("userKey", hostUser.getUserKey());
    return "info-page";
  }
}
In our template, we use this model attribute to get access to and display all of the other parameters in our render context.
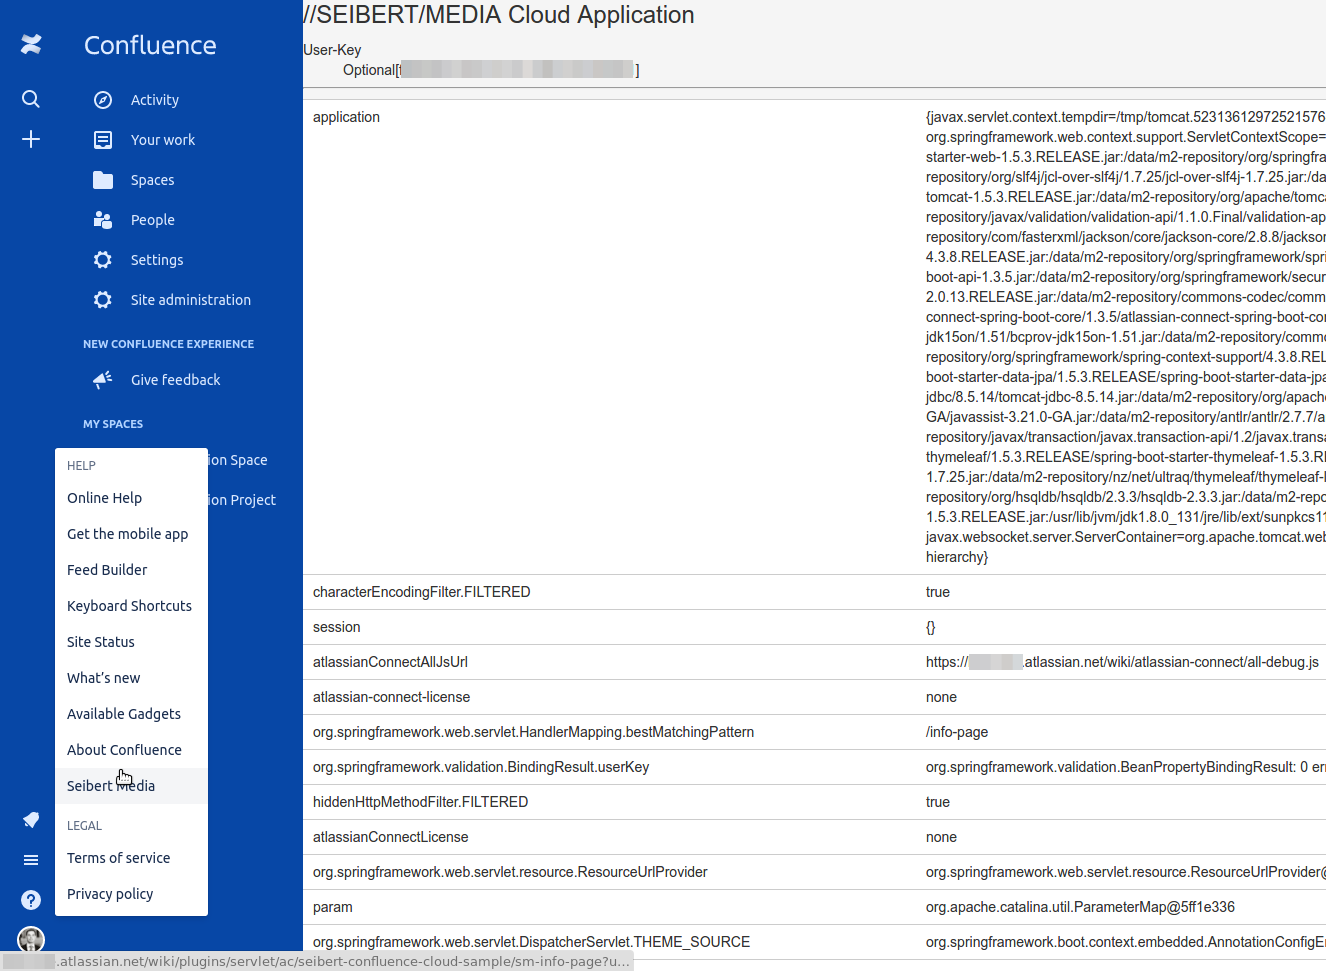
<!DOCTYPE html> <html xmlns:th="http://www.thymeleaf.org"> <head> http://@$atlassianConnectAllJsUrl <link rel="stylesheet" href="//aui-cdn.atlassian.com/aui-adg/6.0.0/css/aui.min.css" media="all"/> <link rel="stylesheet" href="//aui-cdn.atlassian.com/aui-adg/6.0.0/css/aui-experimental.min.css" media="all"/> https://ajax.googleapis.com/ajax/libs/jquery/1.8.3/jquery.min.js </head> <body></body> </html>//SEIBERT/MEDIA Cloud Application
- User-Key
Now we add the following element to the plugin descriptor, to register our page in the Confluence Cloud instance.
"modules": {
	"generalPages": [
	  {
		"url": "/info-page",
		"name": {
			"value": "Seibert Media"
		},
		"key": "sm-info-page"
	  }
	]
}
Then we add another element in the descriptor to add a link to our dynamic page in the Atlassian help menu:
"modules": {
	"webItems": [
		{
			"key": "info-page-web-item",
			"location": "system.help",
			"weight": 200,
			"url": "/info-page",
			"name": {
				"value": "Seibert Media"
			}
		}
	]
}
Then we have to upload our plugin descriptor again (as you saw in the first part of the tutorial).
Finally, we can access our dynamically generated and server-side pages via the help menu:
Accessing Confluence Cloud data via the REST client
In the next example, we would like to retrieve Confluence Cloud build information via a REST resource.
To do this, we will establish an OAuth2-authenticated client connection to our Confluence Cloud instance's RESTful web services from our Spring Boot app and make the retrieved build information available at a URL.
This is our data transfer object (DTO), encapsulating some of the build information:
public class BuildInformation {
  private String versionNumber;
  private String buildTimestamp;
  private String buildNumber;
  private String revisionNumber;

  // getter, setter, tostring...
}
Here is our example REST client, which uses AtlassianHostRestClients to establish an authenticated connection to the Confluence Cloud instance:
@Service
public class ConfluenceClientService {
  [..]

  @Autowired
  private AtlassianHostRestClients atlassianHostRestClients;

  public BuildInformation getBuildInformation(String baseUrl) {
    String url = baseUrl + "/rest/prototype/latest/buildInfo";

    log.info("calling confluence host with api-url: {}", url);
    return atlassianHostRestClients.authenticatedAsAddon()
        .getForObject(url, BuildInformation.class);
  }
}
This is a simplified controller that detects the URL from the first Confluence Cloud instance it recognizes, passes it to the REST client, and then displays the build information.
In a live scenario, we would have to take into account the fact that 0... n Confluence Cloud instances can be connected to our Spring Boot application.
@Controller
public class ConnectedHostsAudit {

  @Autowired
  ConfluenceClientService confluenceClientService;

  @Autowired
  AtlassianHostRepository atlassianHostRepository;

  @RequestMapping("/build-info")
  public String buildInformationPage(Model model) {
    AtlassianHost host = atlassianHostRepository.findAll().iterator().next();
    String baseUrl = host.getBaseUrl();
    BuildInformation buildInformation = confluenceClientService.getBuildInformation(baseUrl);
    model.addAttribute("buildInformation", buildInformation);
    model.addAttribute("host", host);
    return "build-info";
  }
}
The following Thymeleaf template displays the retrieved build information:
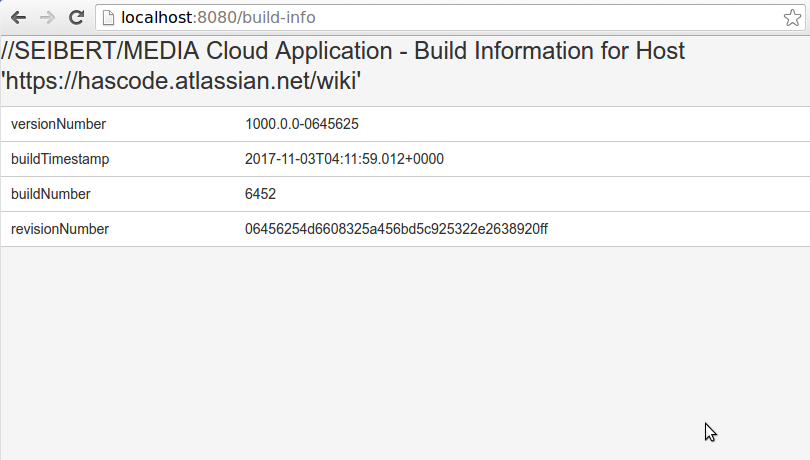
<!DOCTYPE html> <html xmlns:th="http://www.thymeleaf.org"> <head> http://@$atlassianConnectAllJsUrl <link rel="stylesheet" href="//aui-cdn.atlassian.com/aui-adg/6.0.0/css/aui.min.css" media="all"/> <link rel="stylesheet" href="//aui-cdn.atlassian.com/aui-adg/6.0.0/css/aui-experimental.min.css" media="all"/> https://ajax.googleapis.com/ajax/libs/jquery/1.8.3/jquery.min.js https:///aui-cdn.atlassian.com/aui-adg/6.0.0/js/aui.min.js </head> <body></body> </html>//SEIBERT/MEDIA Cloud Application - Build Information for Host ''
versionNumber buildTimestamp buildNumber revisionNumber
Now the build information can be retrieved from the configured address, as shown in the following screenshot:
That's the end of this two-part introductory tutorial on Confluence Cloud apps with Spring Boot and Atlassian Connect. Do you have any questions or comments? Are there specific use cases or challenges in connection with your Atlassian systems that could be solved with custom apps or integrations? Contact us: We look forward to talking to you!
Lesen Sie diese Seite auf Deutsch


