
Customizing Confluence Space Menus
For those of us who spend some, or perhaps almost all of our day within a mix of Confluence pages and Spaces, we often hear a siren song of change. The ability to customize the look and feel of Confluence, even just slightly from time to time, can bring a welcome sigh of relief to you and your colleagues. This includes details that some may overlook or consider minor, such as the navigational menus themselves.
Let’s be honest, when it’s a comparison of engaging with a tool or site that appears dull, boring, or static vs. one that brings some style and great design, users will choose the latter. It’s a more positive experience overall and this then draws users back to use it more often and most effectively. The work doesn’t just get done, it gets accomplished. It can imbue a sense of pride and fulfillment at the team level, all the way up to the company itself.
We’re here to bring some pizzaz to your long dreary Winter of boring Confluence space menus, adding some pizzaz with color and branding customization.
Think Globally, Act Locally
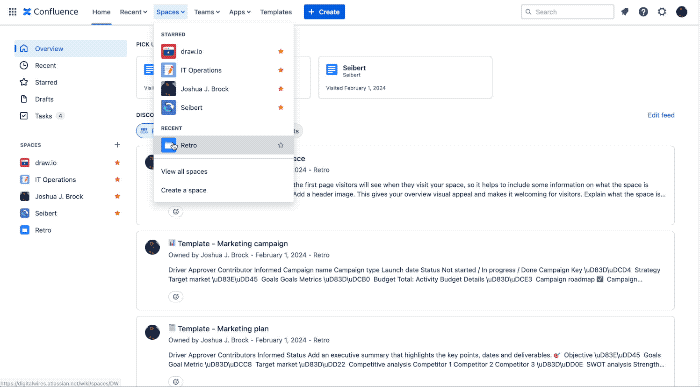
What do we mean by that in this context? Simply to start, there are differences between customizing settings for the Confluence global look and feel of an instance versus that of a specific Space within it.
When a new Space is created, the theme applied to the whole site will be applied by default to this new Space. To change colors for individual Spaces, you'll need to download a theming app from the Atlassian Marketplace.
You can change the appearance, or look and feel of Confluence Cloud for the whole instance (globally) or respective individual Spaces. Changes you make to the whole site trickle down and apply to all Spaces within it. Those with administrator permissions can further customize the appearance and override the global settings.
Customize That Confluence Look and Feel
In this article, we’ll get you headed in the right direction on the basics like the logo, changing colors, and overall making it look more in tune with your organization and its branding. To note, these require admin rights to your instance.
Let’s start at the global level with a few key settings and then drill down to the Space level with some options that will make Confluence more in tune with your company or brand identity.
Navigate to the Confluence administration button in the top right of your window. Then, from the left navigation window, scroll down to the Look and Feel section to find the options you’ll need; color scheme, logo and favicon, header and footer, and many more.
Color Scheme
In this section, you’ll be able to customize the color scheme of your site. This includes both background and access colors using either standard HTML/CSS3 codes, or using the color-picker from the palette provided. When changes are made here, they will immediately be cascaded across all of the Spaces within your Confluence instance. Not happy with the results? No worries, you can use the Reset option to switch back to the default setup.
Site Logo and Favicon
One of the most important elements of your brand is the logo, so adding that element to your Confluence site helps reinforce the image throughout the organization. In this section, select your site logo and customize the site title with just a few clicks. Furthering the customization, change the site favicon by uploading an image in either PNG, GIF, JPEF, or ICO format.
Header and Footer
Here you can add a custom header and footer every page within your Space. You have the option of using Confluence’s wiki markup syntax to indicate either Headings (H1, H2, etc.), Lists (bulletted, numbered, or a combination of both), Tables, and more.
Other Options - Themes, PDF Export, Default Space Logo
While we won’t be touching on these customization options here, just know you can further refine the look and feel of your Space.

This will now give your Confluence instance a more familiar look on that is more in tune with your company or brand’s identity.
At the Space level to refine the look further, navigate to the space in your Confluence Cloud instance you’d like to work with and then;
- From the Space settings in the sidebar, select Space details
- In order to edit the space name and logo…
- Click Edit to the right of the current logo
- In the Space name area, enter in the new name
- To change the logo using a custom file, click the Upload file button and navigate to the file, then click Save
- To change the logo using one from the gallery, click Gallery, make your selection, then click Save
This was a first step; accessing and manipulating the Confluence Space tools look and feel. You’ve customized both the Global and Space settings just as you’d like. But maybe in addition to the look, you’d like to take it a step further beyond the cosmetics and how your users navigate and move through Confluence. We’ve got just the tool for you.
Helping Others Navigate Their Way
Menus are those elements of the graphical user interface, also known as “GUI”, that tie everything together. Confluence users are used to navigating around websites and apps with menus that group areas or topics together. Their frustration is real when they discover that Confluence doesn't offer any way to reproduce that website style experience to help you find your way around!
Customizing the navigational look and feel to that level requires functionality that Confluence does not include on its own. However, we just happen to know of an app that does; Navigation Menus for Confluence.
Putting the “Graphical” in GUI
So you’ve taken that first step in customizing your Confluence instance with your organization’s brand colors, logo, favicon - the whole nine yards. Now, you want to help guide them through this new, beautiful, inspiring workspace by customizing the Space menu look and feel.
Once you’ve added the Navigation Menus app from the Atlassian Marketplace, you can begin configuring it to your needs.
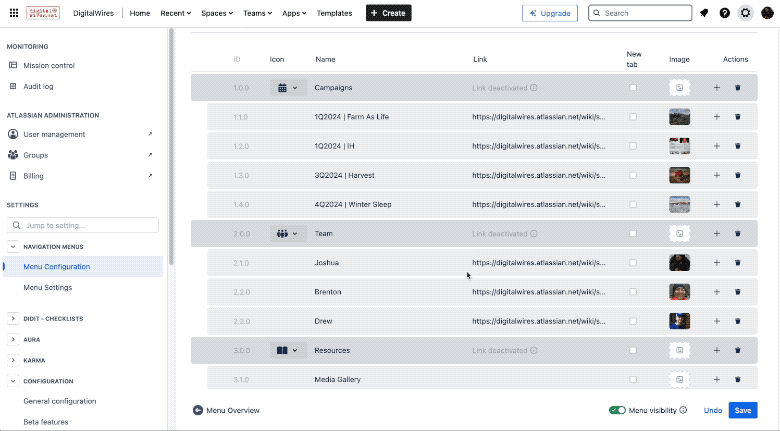
In the image above, you’ll see the final result of menu customization we did for our Marketing team. Let’s walk you through how we were able to achieve it.
We chose our primary menu item to be Campaigns, with the subsequent projects our Marketing team would be working on throughout the year as sub-menus. The app also gives us the ability to assign unique icons to each, further differentiating and highlighting the graphically driven nature of the app.
To get started, lick the Confluence administration icon in the top right, and then from the lefthand navigation menu under NAVIGATION MENUS, select Menu Configuration.
Your first time doing so, you will see only the Demo menu which has been placed there automatically upon installation. To create your first menu, click the blue + Create Menu button. After doing so, you’ll be able to name the menu to best fit your needs, adjust the foreground and background colors, and assign it to specific groups and Space category assignments (if you wish).
Note that at the outset, the Demo menu has been set as the default menu. To change it to your new menu, simply click the radio button beside it. You can create as many menus as needed, and then choose to make them visible or not.
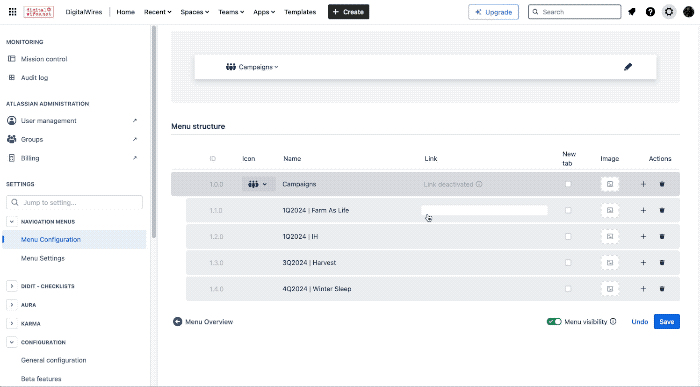
Take a look at the following, where we enter the Menu Configuration options to begin our work. We set the name of our menu, set the theme and colors, and assign it to the appropriate category assignment.

Our next steps were to add the sub-menus under Campaigns and insert the appropriate links and teaser images.
You directly link your users right to the relevant pages for those menu items by selecting the appropriate page in the Link. Additionally, you can add images to these sub-menu items to make the content more impactful. To do so, click the Image icon for the respective item which will then open up a dialog box where you can enter the URL.
To find the URL for the image you’d like to use, simply navigate to the Attachments sub-page on any of your pages where images are stored. Right-click on the image's name and select Copy Link Address. Now, insert the copied link address into the URL dialog box.
A Finished Product to Be Proud Of
As you are building your menus with Navigation Menus for Confluence, the preview in the Menu Configuration window will give you real-time feedback on the look and functionality of what you’re creating.
On a final note, it’s not just simply improving basic navigation, it’s about being able to customize the experience based on elements such as where your users live, the language(s) they speak, the type of work they do, or the department they are based within. Navigation Menus offers that level of customization so your teams in Germany get presented with the appropriate menus for them, while your team in the U.S. sees theirs in English, and Marketing navigates via menus built for them and Sales can receive a different, more appropriate set for their needs.
In the end, we’re certain you and your crew will be really satisfied with the customization you’ve been able to achieve with your Confluence instance and Spaces. Some small changes can go a long way in making the ordinary “extraordinary” and re-engaging your teams. It can better help them find what they need, making them feel comfortable navigating through the Confluence environment they spend the majority of their workday within.
To learn more about Navigation Menus for Confluence, give the documentation a read and check out the instructional videos included on the Support link.
Further Reading
- The Best Way to Organize Confluence Spaces
- Confluence Cloud: Never Get Lost in the Depths of Your Wiki Again | Navigation Menus – Quick & Easy Orientation
- Instant Websites From Confluence with Spacecraft
- Documentation from Jira to Confluence – How It Works with Autopage!


